This post may contain affiliate links. Please read our disclosure policy.
These are the BEST vegan gingerbread cookies you will get your hands on. They are easy to make, don’t require any funky ingredients and are SO DANG GOOD!
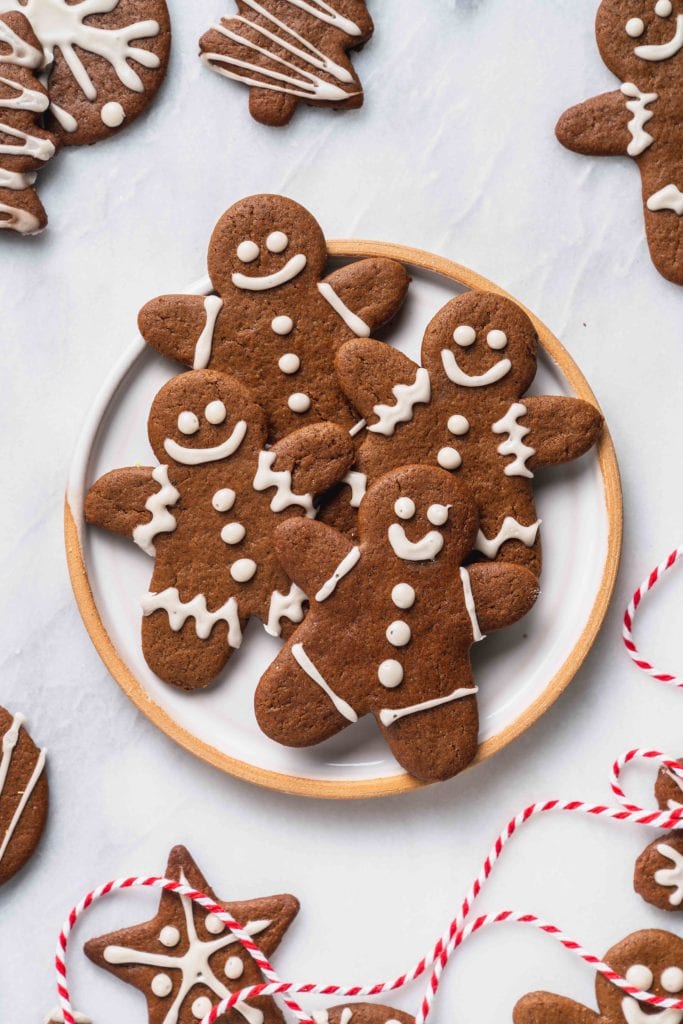
Gingerbread cookies are the best Christmas cookies, I don’t care what anyone says 😉
They are bursting with flavor, they smile back (lol) and I don’t know, they are just so cozy tasting to me! Serve these with a cup of fresh almond milk and oh my dayummm, it’s perfect. Santa is going to love these, too!
Chris and I realized that we somehow did not have a vegan gingerbread cookie recipe on the blog yet so today, we are changing that!

A few notes to make this recipe easier for you:
- We recommend you roll and cut out cookie dough directly on a lightly floured silicone baking mat (or parchment paper) that you will be baking them on. This way you can pick up the mat/parchment and place it directly on the baking sheet to avoid distorting the shape of the cookies
- Chill the cut cookie dough on the baking sheet in the fridge for at least 10 minutes before baking just to ensure that they keep their shape.
- The cookies will seem soft them you remove them from the oven but fear not! The cookies will set as they cool.
- The baking time will depend on the size and thickness of your cookies, plus how soft or crunchy you will want them. The first batch is a good test for you to determine what works for you. We baked ours for 11 minutes as we like them soft.
- Be sure to ice the cookies only when they are completely cooled! Also, the icing is a bit sensitive so stacking the cookies on top of one another to store may smear the icing.

Looking for more holiday desserts? We’ve got you covered!
- Homemade Vegan Hot Chocolate Mix
- Classic Vegan Brownies
- Vegan Peppermint Meltaways
- Gluten-Free Thumbprint Cookies (Vegan + 8-Ingredients)
- Cinnamon Twist Christmas Cookies (8-Ingredients)
- Chai Spiced Hot Cocoa Mix
If you make this recipe, let us know what you think in the comments below! + If you post any photos on Instagram, make sure you tag us @sweetsimplevegan and @consciouschris so that we don’t miss it, we love seeing your photos!
Print
Vegan Gingerbread Cookies
- Total Time: 1 hour 27 minutes
- Yield: 3 dozen
Description
These are the BEST vegan gingerbread cookies you will get your hands on. They are easy to make, don’t require any funky ingredients and are SO DANG GOOD!
Ingredients
Gingerbread Cookies
- 1 stick (1/2 cup or 112g) vegan butter, softened/at room temperature
- 3⁄4 cup packed (168g) dark brown sugar
- 3/4 cup (180mL) molasses
- 1/2 tablespoon (6.5g) vanilla extract
- 3 cups (360g) all purpose flour
- 1/2 tablespoon (7g) baking powder
- 1 teaspoon (4g) baking soda
- 1 tablespoon (5g) ground ginger
- 1 teaspoon (2.5g) ground cinnamon
- 1/2 teaspoon (1g) ground nutmeg
- 1/4 teaspoon (0.5g) ground cloves
- 1/2 teaspoon (2.5g) salt
Icing
- 1 cup organic powdered sugar
- 1/4 teaspoon pure vanilla extract
- 1 1/2 to 2 tablespoons unsweetened almond milk
Instructions
- Remove the butter from the refrigerator and allow it to rest at room temperature for at least 30 minutes before starting.
- In a large bowl, sift in the flour, baking powder, baking soda, ginger, cinnamon, nutmeg and cloves. Add in the salt and mix everything together until uniform. Set aside.
- In another large bowl, add in the softened vegan butter, molasses and brown sugar. Using a hand mixer or standing mixer, cream everything together until nice and fluffy. Add in the vanilla and mix until it has combined. Alternatively you can do this by hand by whipping vigorously with a whisk. Carefully add the dry mixture to the wet and mix until uniform using a spatula or wooden spoon.
- Gather the mixture together in your hands and “knead” it together to form a large ball. Place it back into the bowl and cover it with a lid (if it has one) or with plastic wrap and allow it to rest in refrigerator for 1 hour.
- After an hour, remove the dough from the fridge. Next you will need to roll out the dough to 1/4 to 1/2-inch thick using a rolling pin, cup, etc. We broke our dough into 3 pieces to roll out. To make things easier and also to not distort the shape of the cookies, we rolled and cut our cookie dough directly on a lightly floured silicone baking mat (or parchment paper) that we will be baking them on. This way we could pick up the mat/parchment and place it directly on the baking sheet. Be sure to leave 1/2-inch between each cookie so they do not bake into each other. If you do not want to do this, just roll the dough out on a lightly floured work surface, cut it out with your cookie cutters and use a spatula to transfer them to a lined baking sheet.
- Chill the cut cookie dough on the baking sheet in the fridge for at least 10 minutes. We also like to place our leftover dough in the fridge when we are not using it to keep it chilled.
- In the meantime, preheat the oven to 350F. Once the cookies have chilled, place them into the oven and bake for 11-13 minutes. Remove the cookies from the oven and allow them to rest on the baking sheet for 2 minutes, and then transfer them to a wire rack to cool completely. (See notes)
- Once the cookies have completely cooled, you are free to ice them as you would like! To prepare the icing all you have to do is whisk all of the ingredients for the icing together, transfer it to a piping back and have fun! Just be sure to allow the icing to rest to harden.
- Store in air tight container and enjoy 🙂
Notes
- Keep in mind that the cookies will firm up as they cool! Also note that the baking time will depend on the size and thickness of your cookies, plus how soft or crunchy you will want them. The first batch is a good test for you to determine what works best for you. We baked ours for 11 minutes as we like them soft.
- The icing is a bit sensitive so stacking the cookies on top of one another to store may smear the icing a bit.
- The nutrition facts do not take into consideration the addition of icing.
- Prep Time: 1 hour 15 minutes
- Cook Time: 12 minutes
- Category: Cookies, Christmas
- Method: Oven
- Cuisine: Vegan
Keywords: Cookies, Christmas, Gingerbread, Vegan, Baked Goods, Dessert, Kid Friendly, Molasses
Nutrition facts label provided by Nutri Fox.
Disclaimer: The nutritional information shown is an estimate provided by an online calculator. It should not be considered a substitute for a professional’s advice. This page may contain affiliate links, which simply means that we earn a commission if you purchase through those links, but your price remains the same. Thank you for supporting Sweet Simple Vegan!


Jasmine and Chris, I’ve been watching for years so I should’ve known these would be good… but these are legit the BEST cookies I have ever made. Obsessed. The easiest dough, the finished cookies are perfectly soft and chewy when you roll them thick and take them out at 11 mins– you have created an actual addiction in our household. Nothing weird or scary or complicated, just a simple and delish recipe. THANK YOU!!
★★★★★
I made these cookies for the second time, for my daughters Christmas Party and everyone loved them and wanted the recipe! I wish I could send pictures they were snow flakes, and they turned out beautiful Thank you Sherry Olson
★★★★★
After they were decorated, they were break your teeth hard. The next day, however, they were PERFECT! They softened up into a chewy, amazing cookie. The level of spice is wonderful, and I do believe this chocolate loving girl now loves gingerbread the best!!!! I have tried many eggless and dairy free gingerbread cookies due to my son’s allergies, and these win BY FAR! Amazing recipe, thank you!!!!!
★★★★★
This recipe was great! My dough was very crumbly and I added a few splashes of almond milk until it held together on its own. I’ve made other cookie recipes before when the dough was crumbly and pressed together and they didn’t turn out well after baking, but the milk addition really helped here. The ball of dough kept well in the refrigerator for a couple days until I was able to bake and they turned out beautiful. Made cookies a little thicker and baked for ~12 mins, they cooled and firmed up nicely while keeping soft.
★★★★★
I only had blackstrap molasses, so I used maple syrup and it worked beautifully!! Made the dough the night before and rolled it out first thing in the morning into a cookie sheet sized man to surprise our grandson when he arrived. We read the Gingerbread Man book and then frosted and devoured our giant Gingerbread Man cookie! I rolled my cookie dough on the thinner side and baked 9 minutes. They are the exact right texture, the perfect amount of soft and chewy, and absolutely delicious!
★★★★★
These cookies were phenomenal. Tasted great and were simple to make. We like our extra soft so we only baked for nine minutes and they were still firm once cooled. If you are looking for an awesome gingerbread recipe, look no further.
★★★★★
So excited to try these out tonight with my babies. Unfortunately our house got hit with Covid and we are all doing our best to keep the spirit and joy alive. I can’t taste or smell and neither can my husband, but I’m sure they’ll be delicious!! ????
Hi can I use Oatmilk instead of almond. I’m very allergic to almonds
★★★★★
Absolutely!
Can I freeze these cookies?
We haven’t done it, but from our research they can be frozen, just make sure they’re completely cooled before doing so.
Would a regular stick of butter work as well??
We haven’t tested it!